I like photography and I like having a dedicated space to share my photos along with a little story behind it. Currently that space is a self hosted Wordpress website, with all the images in folders. It is served at DigitalOcean and it costs me 5$ a month. The URL for this is stefanis.studio. I wanted to simplify things and bring my photography content in a subsection of this website, but I don’t want to have all those photos in a folder here. Moreover I want to be able to serve more optimized photos.
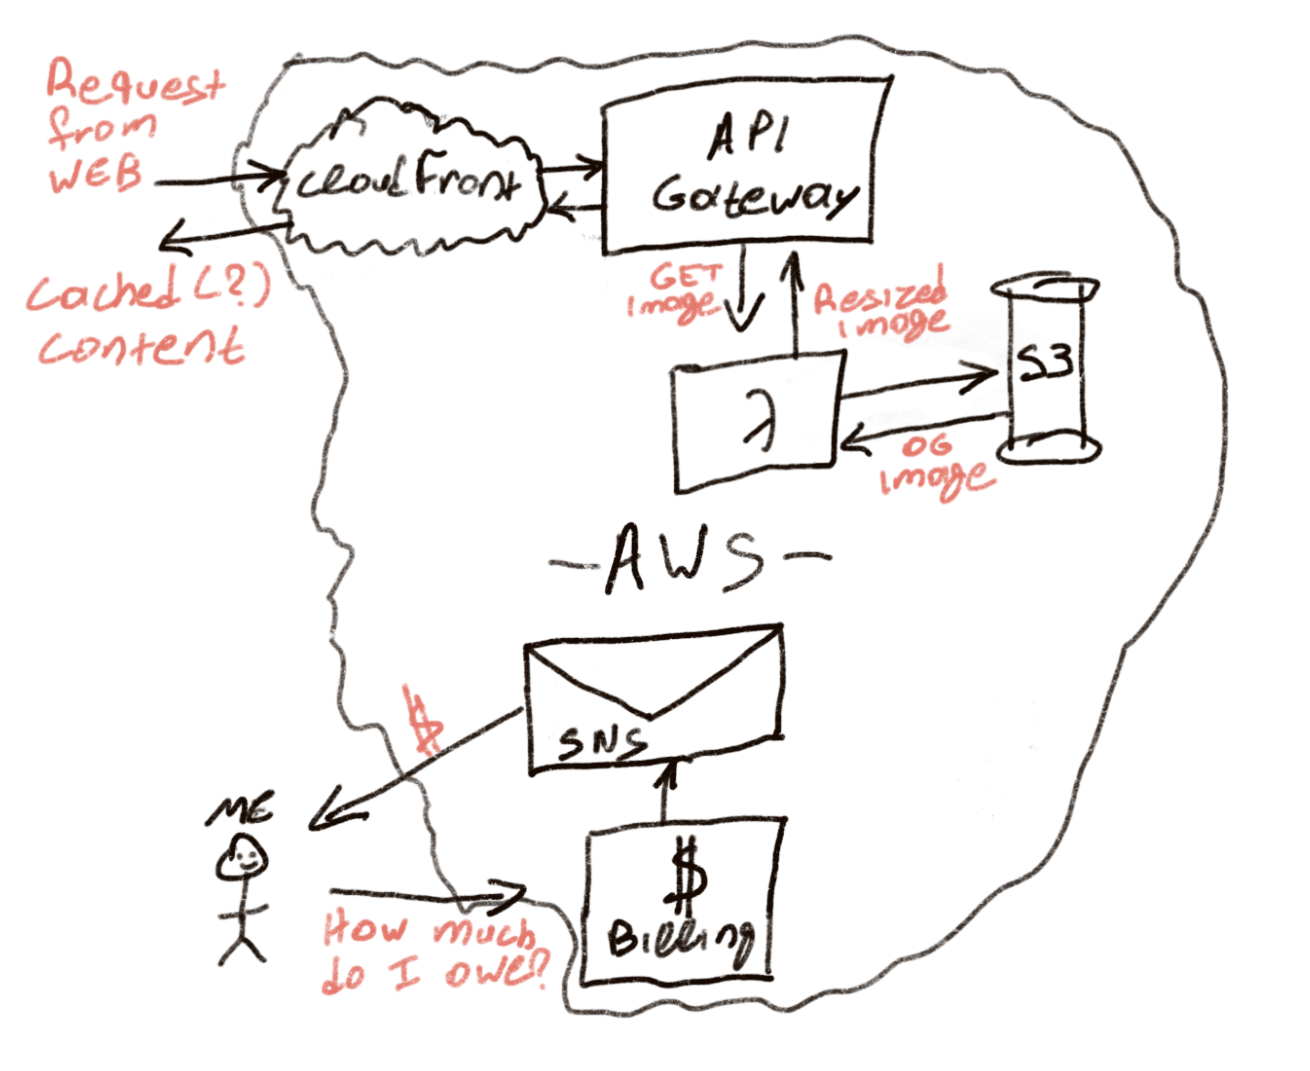
The first thing that came in mind was AWS S3. Put all the images there, link them from the website. But what about optimization? Ideally I don’t want to manually optimize those images. It kills my buzz and it’s very time consuming. I found various articles on the web mentioning on the fly optimization using AWS Lambda. So that’s what I decided to do. Finally, it’s sensible to be money consious and not call that lambda all the time, or call it directly from the web. For that we will be using API Gateway and CloudFront on the front to cache requests. The general diagram of things work looks something like the diagram below.
Setting up an S3 bucket
This is the easiest part in my opinion. Go to the S3 homepage and create a new S3 bucket. Give it a fancy name and make a note of it.
Setting up the Serverless resize app
This isn’t all that difficult either. The app we are looking to deploy is called image-resizer-service and it requires 2 things. First the S3 bucket name, which you’ve made a note above, and an ImageMagickLayer ARN. You don’t have this, so you need to create it and copy the ARN. The layer can be found here, just deploy it and once it’s done you can find it here and make a note of the ARN.
Going back to the image-resizer-service we now have all that we want. The S3 bucket name and the ARN of the layer. Drop them in the correct fields and deploy. If everything went well you will be able to see your new app in the CloudFormation homepage.
Test the progress so far
At this point go ahead and upload an image onto your S3 bucket. Lets assume it’s called image1.jpg. Going to a URL like https://abc1a2cl3c.execute-api.us-east-1.amazonaws.com/production/image1.jpg?width=400&height=500 should serve the image, in the requested resolution! Congrats, you did the hard work.
If you can’t find your URL check in your API Gateway dashboard. It should be there on the top of the page (API: YourName –> Stages –> Production).
CloudFront
The last step is adding CloudFront in front of it. The reason is that without it you will end paying a lot more money. For every request on your website for the image a new request will keep happening on your serverless app. That costs money and it’s inefficient use of resources. On the contrary CloudFront is a CDN and as such it’s distributed across many geographies and it’s also cost effective. So don’t skip this step.
To set it up visit the CloudFront dashboard and create a new distribution. In there in the Origins and Origin groups add the full URL of your API Gateway. Optionally you can add the /production or /staging. Depending on that option you will be calling the URLs differently. The final Cloudfront URL should look something like **https://sfd2g34sf.cloudfront.net/image1**if you added the /production on the above link OR https://sfd2g34sf.cloudfront.net/production/image1. Note that both CloudFront and API Gateway respect the folder structure of your S3 bucket, so doing https://sfd2g34sf.cloudfront.net/my-folder/image1 is perfectly possible.
That sounds expensive
I shared my story on Twitter and Yuriy reminded me about a hard truth. Money. Now, I don’t know how expensive that endeavour will be. I will update this post once I have more data. But for a low traffic website I don’t think it will cost that much. To be on the safe side of things I did add an alert for billing. When my usage reaches the 80% of 20$ that I arbitarly set as a budget I’ll get an email. That’s all done via SNS and it’s actually very easy.
The only thing worth sharing here is that you need to add the following statement (make sure you get the correct ARN number) into your Access Policy configuration. From there onwards setting alerts is done.
{
      "Sid": "AWSBudgets-notification-1",
      "Effect": "Allow",
      "Principal": {
        "Service": "budgets.amazonaws.com"
      },
      "Action": "SNS:Publish",
      "Resource": "arn:aws:sns:us-east-1:xxxxxxxxxxxx:ABC"
    },
Closing thoughts
Was this necessary? No it wasn’t. I could have sticked with WordPress, I could have linked straight from the S3 bucket. Was it fun? By all means! I did enjoy doing it, and I applied a lot of theoretical knowledge on using AWS. I would do it again. Now I need to monitor the performance and the cost of this. I am blissfully ignorant and positive though.